Etude House Beauty Shot Face Blur Review

10:56:00 AM 6 Comments A+ a-


The first time I heard about Etude House Beauty Shot Face Blur I was really intrigued by the idea of what this product could do for my skin.
As described by Etude House, Beauty Shot Face Blur creates a "multi-blurring effect" to the skin. So, what exactly is this "multi-blurring effect" about? That's where I got very curious.

The theme color for this product is salem. From the box to the bottle and even the cream itself is salem colored. This product comes in a pump and YES, I love pump packaging because they're clearly more hygienic and it's easier to control the amount of cream that I want to apply.

 
Etude House Beauty Shot Face Blur comes with SPF 15/PA+ and as written on the box, the purpose of this product is to give three effects to the skin. Smoothing, pore hiding, and tone up. First, It will make it so that the skin texture will appear soft and smooth. Second, it will make uneven skin and pores less visible, or in this case to "look blurred". And finally, it will help brighten the skin tone.
The end goal of this product is supposedly to make your skin to look like it has been photoshoped - and who doesn't want to have Photoshoped skin in real life, right? :D

The cream's texture is lightweight and not oily at all, and it smells like baby powder. Once the cream is even on the skin, it gives a pearly finish. And yes it does tone up my skin color as you can see in the picture below as I applied it on the back of my hand and my face:


The product itself is supposed to be used as primer, after the moisturizer and before foundation and makeup. However, often times I'd find that just applying compact powder after using the Beauty Shot Face Blur was already good enough to cover all my skin imperfection. When I applied it on my face it got absorbed really quickly and it left my skin feeling smoother. And what I like the most about this product that it doesn't make the skin feel sticky.

So does this product really work as well as promised? Well, you can judge it yourself from the comparison below:
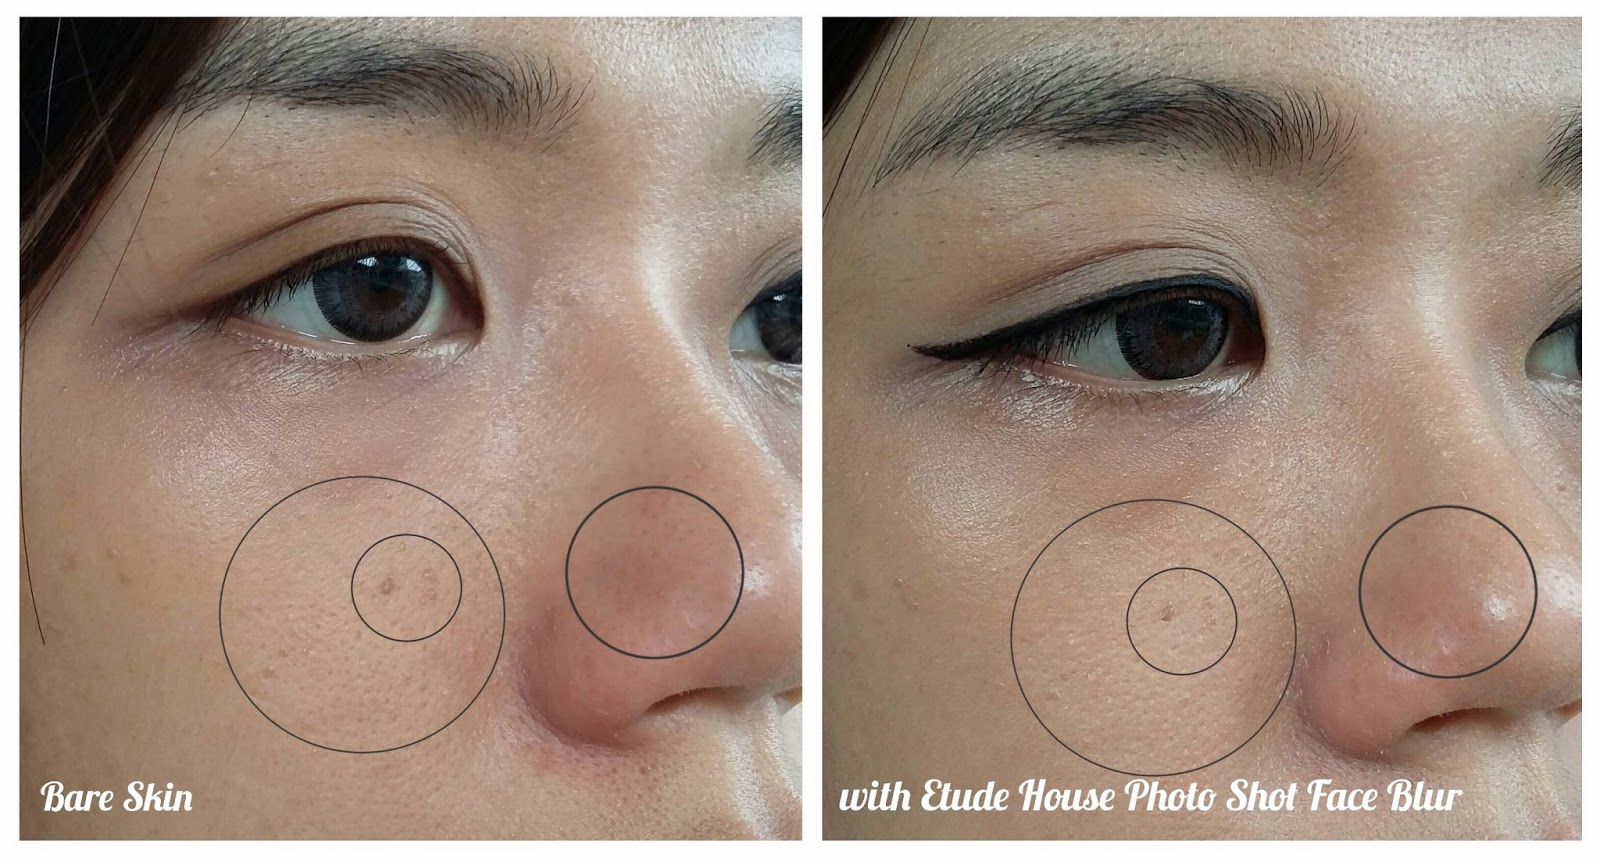
I circled all my skin imperfections and as you can see from the picture above, before I used Etude House Beauty Shot Face Blur all my pores looked so obvious. But after I applied the cream, my pores look like they'd been blurred. It even blurred my milia and I swear I haven't touched the photo at all! It also gives a dewy look to my face. The only thing that I don't like about this product is that it kind of makes my skin look a bit pale. Other beauty bloggers have said that it's best to combine this product with cushion foundation, but it's too bad I haven't found the best cushion foundation that works well on my skin yet.

So, have you guys tried this product as well? What did you think of it? :)

P.S. I just found this Etude House Beauty Shot Face Blur commercial break on YouTube, and I found the video is quite hilarious :D Here's the video, hope you enjoy it as well ;)

Valentine Day K-pop Makeup Challenge by Rini Cesillia and Etude Recipe (Makeup Natural Ala Korea)

10:56:00 AM 9 Comments A+ a-

Annyeong Haseyo!

Sebenarnya aku udah niatin untuk ikutan submit Makeup challenge (MUC) dari Rini Cesillia yang disponsori oleh Etude Recipe ini dari sejak pertengahan bulan deket-deket Valentine's Day, tapi berhubung February ini ternyata adalah bulan yang "super special", banyak hal yang terjadi yang bener-bener menguras hati, pikiran dan tenaga jadi dah rencananya ketunda terus sampai sekarang. *curcol dikit
Naah, untungnya si MUC ini dibuka sampai tanggal 3 Maret 2015 jadi masih keburu deh :)

Ini adalah kedua kalinya aku ikutan MUC setelah IBB MUC February 2015 Flowery Garden with The Saem Indonesia, dan MUC yang aku ikuti kali ini temanya adalah makeup untuk Valentine's day ala K-Pop. Untuk gaya dandananya sendiri si bebas, boleh recreate makeup look artis K-Pop favorite kita atau kita mau kretif bikin Korean look sendiri berdasarkan interpretasi pribadi. MUC ini sendiri bisa diikuti siapa saja, baik yang punya blog ataupun tidak. Untuk info lebih lanjut dan persyaratan ikutnya kamu bisa click banner MUC di bawah ini:
Rini Cesillia VDay KPop makeup Challage

Dan jelas di setiap MUC pasti ada hadiahnya, dan bohong deh kalo aku ikut MUC ini bukan karena hadiahnya, karena hadiah yang bakal dikasih oleh Rini Cesillia dan Etude Recipe beneran bikin mupeng. 2 item hadiah yang pengen banget aku dapetin adalah:

3 Concept Eyes One Shadow Color #English Rose


3 Concept Eyes Pink Lip Color #506 Daily Lady


Untuk tema makeup ku kali ini aku mengambil tema warna golden brown dan pink. Ga lupa juga bikin kulit wajah terlihat flawless dan glowing yang selalu jadi signature makeupnya korea. Untuk finishing look nya aku buat supaya terlihat sweet dan natural karena my beloved husband emang paling suka lihat aku dandan natural, dan kalo dandan di hari Valentine si buat siapa lagi kalo bukan buat suami tercinta, ya gak? :D

Berikut makeup yang aku gunakan:
FACE
Moisturizer: Olay White Radiance CelLucent White Cream
Concealer: Maybelline Clear Smooth Minerals Healthy Natural Concealer
Foundation: Revlon Color Stay Golden Beige
Illuminator: NYX Born to Glow Liquid Illuminator (Sun Beam)
Powder: Revlon Touch & Glow Face Powder
Cheeks: Maybelline Cheeky Glow (Wooden Rose)
Highlight: Etude House Face Line V-Slim Liner

EYES
Softlens: Eye Candy fresh Grey
Eye Primer: Revlon PhotoReady Eye Primer
Eyeshadow: Boudoir Eyes Soft & Sexy EyeShadow Collection
Eyeliner: MAKE UP FOR EVER PROFESSIONAL Aqua Eyes Pencil Eyeliner (black)
Fake eyelashes: D'EYEKO Premium False Eyelashes Natural Volume
Eyebrows: Etude House Color My Brows (#3 Red Brown)

LIPS
Lipstick: Etude House Dear My Blooming Lips-Talk (PK018).   

Dan berikut step-by-step makeup nya:
1. Sebelum memakai apa-apa, pakai Eye Candy fresh Grey softlens.
2. Oleskan Olay White Radiance CelLucent White Cream sebelum mengaplikasikan foundation merata do seluruh wajah dan leher
3. Setelah pelembabnya dirasa Sudah meresap aplikasikan Maybelline Clear Smooth Minerals Concealer pada bagian bawah mata, ujung bibir, sudut hidung, dan bagian-bagian kulit yang warnanya tidak merata atau memiliki dark spot.
4. Setelah concealer dirasa sudah merata, aplikasikan Revlon Color Stay foundation yang sudah di mix dengan NYX Born to Glow Liquid Illuminator dengan perbandingan 1:2 merata ke seluruh wajah dan leher
5. Aplikasikan Revlon PhotoReady Eye Primer pada kelopak mata dan bagian bawah mata
6. Aplikasikan Boudoir Eyes Soft & Sexy EyeShadow shade Bithday Suit pada seluruh kelopak mata dan bagian bawah mata. Aplikasikan shade Lap Dance pada daerah lipatan mata. Terakhir, aplikasikan shade In the Buff pada bagian tulang alis dan sudut mata.
7. Aplikasikan MAKE UP FOR EVER PROFESSIONAL Aqua Eyes Pencil Eyeliner (black) membentuk cat eye. Jangan membuat garis terlalu tebal. Kemudian aplikasikan kembali MAKE UP FOR EVER PROFESSIONAL Aqua Eyes Pencil Eyeliner pada bagian bawah mata tapi hanya sedikit di ujung sampai sudut pertama bola mata.
8. Setelah menjepit bulu mata asli kita, aplikasikan D'EYEKO Premium False Eyelashes Natural Volume.
9. Brush seluruh wajah terutama bagian bawah mata untuk menyapu partikel-partikel eyeshadow yang jatuh.
10. Aplikasikan Maybelline Cheeky Glow (Wooden Rose) pada pipi tepat di bagian bawah mata membentuk garis lurus
11. Aplikasikan Revlon Touch & Glow Face Powder menggunakan brush ukuran besar tipis-tipis saja.
12. Bentuk alis lurus menggunakan Etude House Color My Brows (#3 Red Brown)
13. Aplikasi kan highlight Etude House Face Line V-Slim Liner pada hidung, dahi bagian tengah, daerah lekukan bibir bagian tengah yang berada di bawah philtrum, dan dagu untuk memberikan kesan mancung dan wajah tirus.
14. Terakhir, aplikasikan  Etude House Dear My Blooming Lips-Talk (PK018) pada bibir.

Dan Voila, inilah hasilnya:
 So what do you think, guys? :) I really hope that this makeup look will win this challenge *fingers crossed :D.

Etude House V-Line Slim Maker Review (#01 Sun Gold/Wood Brown)

11:41:00 PM 2 Comments A+ a-

 Are you looking for a nice contouring palette? If so, the Etude House V-Line Slim Maker is really worth trying.
I found this product in one of my trusted online shop that specializes in selling Etude House's products. Etude House V-Line Slim Maker is the new version of the old Etude House Aloha V-Line Slim Maker and below you can see the picture of the old version:
While the old version was designed in a colorful and cheerful flowery theme, this new V-Line Slim maker is designed in a more vintage theme. Etude House V-Line Slim Maker comes in round thin compact packaging complete with a big mirror inside. This product also comes with a flat brush kept in a plastic cover with a "Etude House" watermark on it.


This product is available in 2 shades, which are #01 Sun Gold/Wood Brown  and #02 Sun Pink/Cherry Blossom. I choose shade #1. The palette is crafted in a hearts pattern and you can see that the bronzer palette is bigger that the highlighter.


This product is packed in a brown cardboard box and on the back, you can read the directions for using this product that, conveniently, is written in English.


Here's the tutorial of how to use Etude House V-Line Slim Maker:
www.etudehouse.com
You can also find this funny little picture of a person with a square round face suddenly becoming slim after using this product. The advertising is kind of exaggerated :D


The ingredients are written on the side of the box:

The pigmentation between the highlighter and the bronzer is in contrast with one another. While the sun gold is highly pigmented, the wood brown is very light. But for me, IT'S ALL GOOD! Because, when I put a bronzer on my nose or my cheeks I don't want it to be noticeable. I want it to look soft and natural so that nobody noticed that I actually contoured my nose or cheeks.
The texture of the two shades is also different to one another. While the sun gold is so shimmery, the wood brown is more like matte and silky.

And, it's not Etude House's products if it hasn't got fragrance. Etude House V-Line Slim Maker also has a soft fragrance and it smells like baby powder. However, the fragrance is very light and once you apply the product, you can only barely smell it.

Conclusion
PROS:
- it is so convenient as it contains two shades, a highlighter and a bronzer, in one package
- The shades are very natural and don't make you look like you have contoured your face
- Available in two types of shades
- It comes with a brush
- I really love the vintage packaging
- Doesn't cause a break out on my skin

CONS:
- Quite difficult to find because It's only available in online shops

So, that's my experience with Etude House V-Line Slim Maker. If you want to see the results on my face you can visit my blog post here:
Valentine Day K-pop Makeup Challenge by Rini Cesillia and Etude Recipe (Makeup Natural Ala Korea)
IBB MUC February 2015 Flowery Garden with The Saem Indonesia

Maybelline Clear Smooth Minerals Concealer Review (Shade: Medium Sand)

10:52:00 PM 1 Comments A+ a-


Because I'm a mother of a super active baby girl (super cute too, btw) and an online merchant, I rarely get to relax during the day. I also often have to stay up late either for work or for keeping my husband company (he's always home late and the nighttime is the only time we have for each other). All this bad habit of burning the midnight oil meant that it was unavoidable that I'd get dark circles under my eyes. To successfully remedy that, I've been using Maybelline Clear Smooth Minerals Concealer, and in this review I'm going to share my experience of using this concealer with you.

Maybelline Clear Smooth Minerals Concealer comes in a small and thin transparant tube packaging. When you open the cap, you will see that this concealer has a built-in wand applicator - which looks exactly like a lipgloss applicator, btw. This concealer is wrapped in a plastic cover and all the ingredients are printed on the plastic cover.

I heard that this concealer actually has 2 shades, but I've never seen the other shade besides the Medium Sand, the shade that I usually bought.

The texture of this concealer is a bit runny. So I myself prefer not to put too much of the cream at first application because this concealer can easily end up being too cakey on my face. After all, this concealer is buildable, so my approach is safe.

The Maybelline Clear Smooth Minerals Concealer also has a medium coverage. Here I did a simple experiment by trying to hide a ballpoint pen ink line on my hand and you can still somewhat see the line after application although it is blurred.

It's also the same with my uneven skin and dark spots. This concealer doesn't really make it totally disappear, but it does help me with concealing blemishes considerably.

Below I also make a comparison of my dark circles before and after using this concealer:

So far I've found that this concealer really helps me make my eyes look fresh. It has a matte finish. Right after I blend it, the shade will normally feel too bright for my skin. However, after waiting for a couple of minutes, the shades will start to blend with my skin color. It also makes my skin color a bit greyish at first, but it's not that obvious and it goes away once I cover it with a foundation.

The price of this Maybelline Clear Smooth Minerals Concealer varies from one place to another. In the Maybelline counter, it's kind of pricey at about IDR. 75.000. The last one I bought was on sale at the Hypermart mall, and it was only at IDR. 43.000. Lucky!

CONCLUSION
PROS:
- Quite affordable especially if you can find it on sale :D
- Works well for covering my dark circles, dark spots and uneven skin
- has a built-in applicator
- doesn't cause my skin to break out

CONS:
- only available in one shade

So, have you also tried Maybelline Clear Smooth Minerals Concealer? What do you think about this product, girls? :)